
General Troubleshoot
-
How to backup the snapshot image to USB
First of all, please enable the snapshot function. You can check with the following procedure.
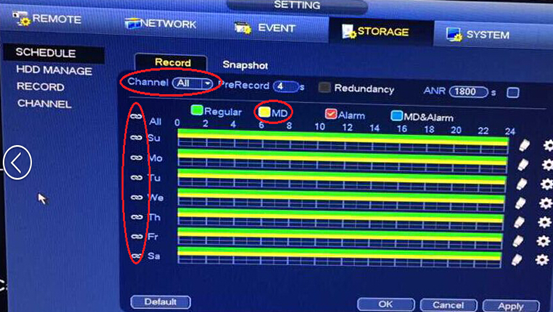
1.Main Menu->setting->schedule, choose the channel that you want to use the snapshot function, enable the snapshot function, and enable MD function in the right period. Please don’t forget to save it.
2.Main Menu->setting->detect, choose the Event Type and the right channel, please enable this detect function and snapshot function with the right channel.
3.Main Menu->setting->encoding->snapshot, please change the mode to trigger.
If you have done that, please Enter Main Menu->Backup, then you will see the picture like this:
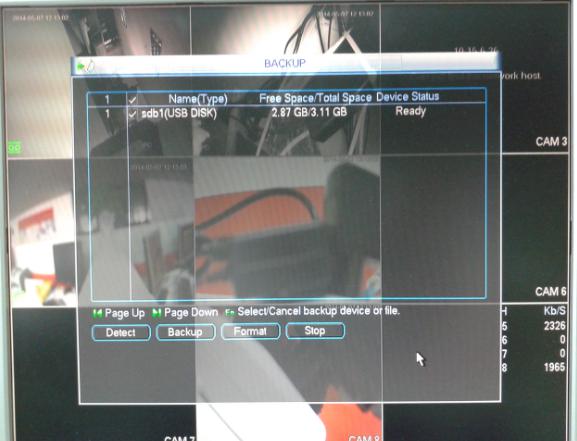
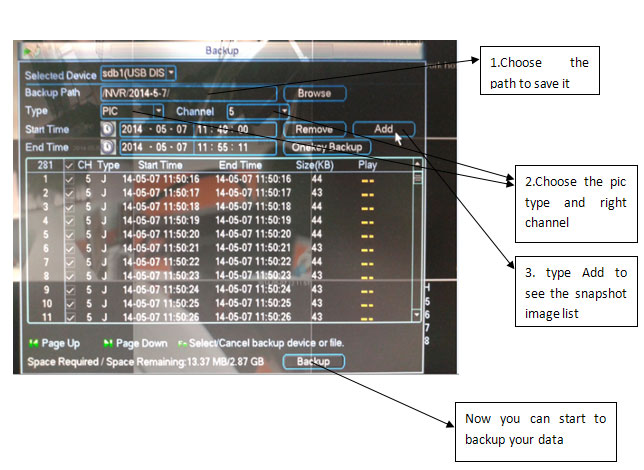
Choose the USB device, then enter Backup. And you will see:
-
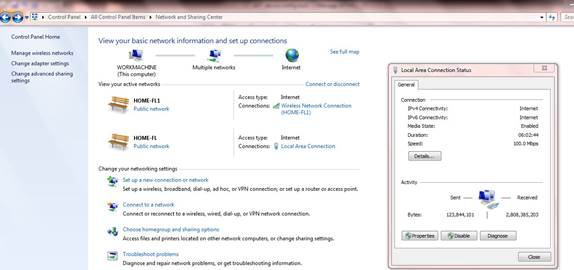
How to connect the device directly
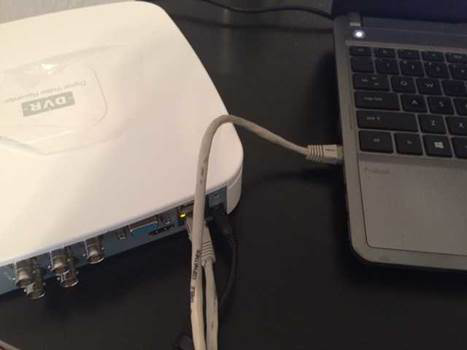
1.To connect directly to the recorder make sure to plug into the LAN port and then you need to configure your laptop.
2.You want to click on your local area network. “not wireless or VPN”
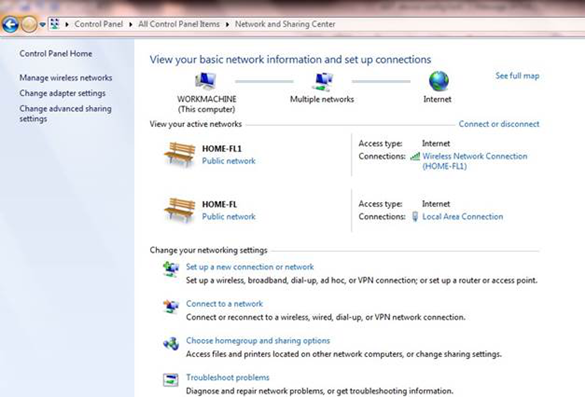
3.After clicking on Local Area Network go to properties:
4.Select TCP/IPv4
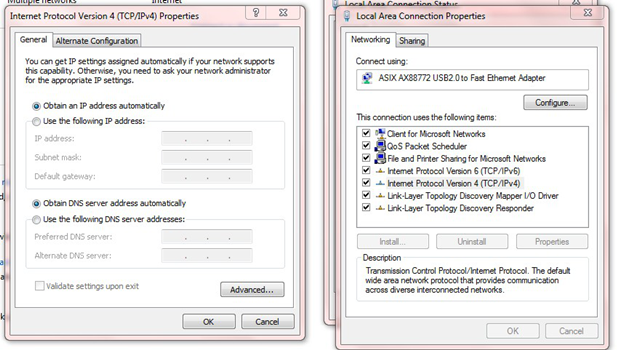
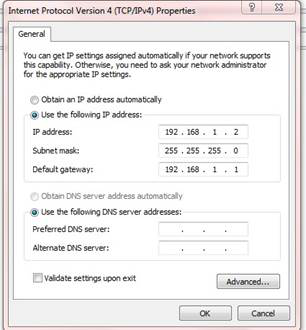
5.Enter this information into your settings and click ok. You now should be able to open a browser and connect to the device directly.
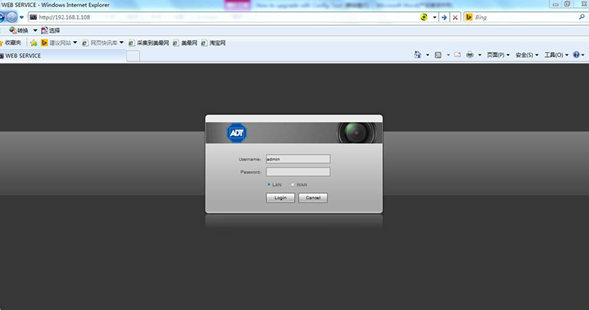
6.Type the IP address of the device and finish:
-
How to get network packets
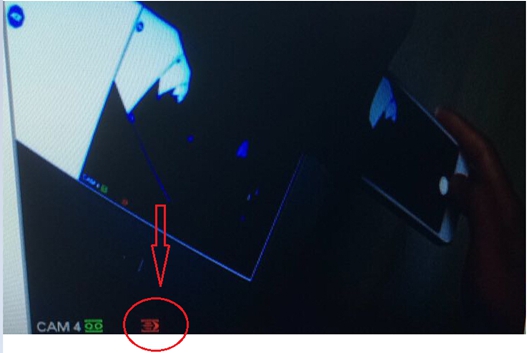
Use USB-disk to backup network packets:
1) In this order Setting→ Info→ Network Info, you will go into Network Test page. If it doesn’t show your device IP, fill your IP in the Destination IP, here 10.15.6.169 is an example.
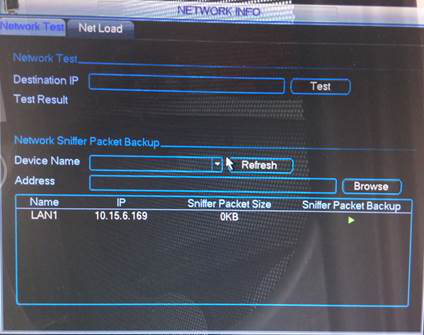
2) Plug a USB disk into the NVR5432-P , and then like the below picture shows, click Refresh button, you can see the USB information.
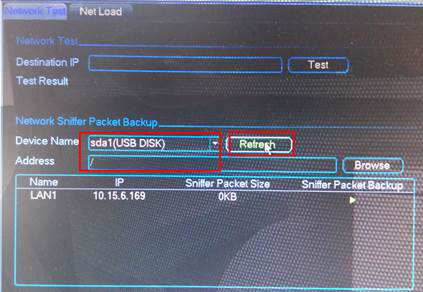
3) Click the triangle button, and the Sniffer Packet Size will keep adding. The package should include the network information when the problem happens.(if you use POE port, just wait for several time to let the data be added, then stop)
4) At last, please kindly send the file in the disk whose name is like LAN1-140429145625.pcap to me.
-
How to upgrade with Config Tool
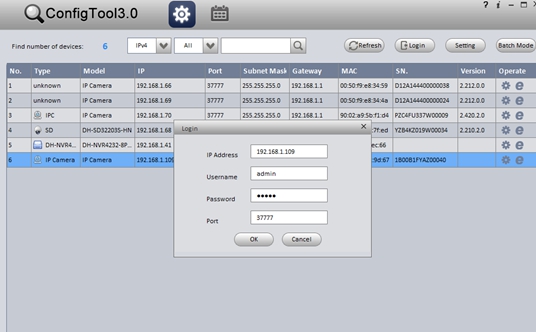
1. Install the ConfigTool, and open it.
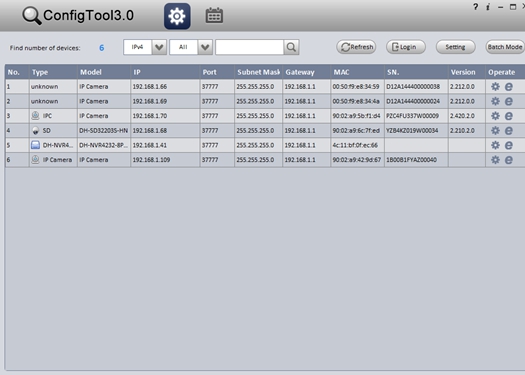
2. If the DVR or the camera all in the same network with this PC, it will display in the Device List. For example, The device which should be upgrade via network is IPC in the list.
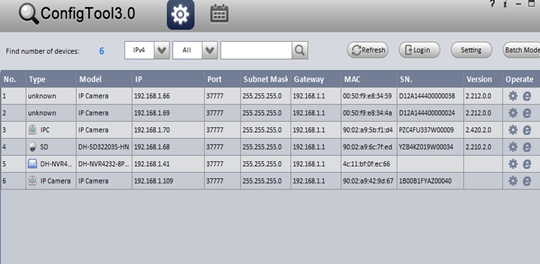
3. Choose the device and double-click or click the loginr, you should login the device first.
4. Click the System upgrade tab for the upgrade interface.
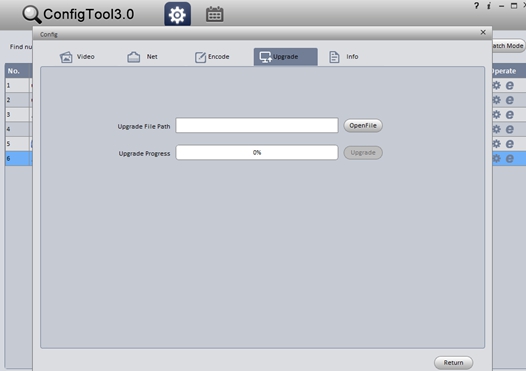
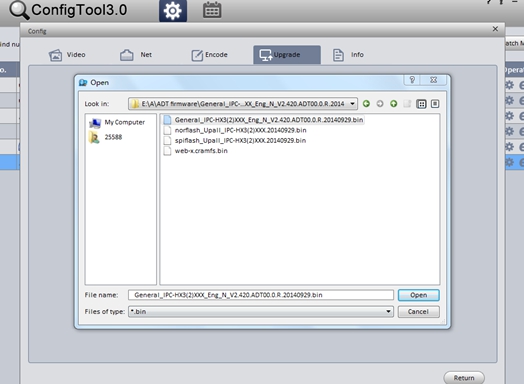
5. Click Open to open the firmware you need to upgrade.
6. Click Upgrade to start the upgrade progress.
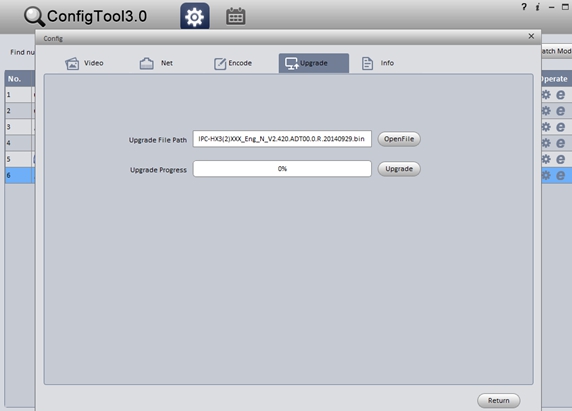
7. You can see a pop-up dialogue to show you the upgrade result. Sometimes the firmware have a big size, so the upgrade progress will cost a few minutes. Sometimes the firmware is very small in size, like the config firmware, so the progress will be very quickly. In some situation, there may pop-up some failure information, that is to show you the upgrade is failed, please check if the firmware were suit for the device, or the network problem there.
8. After upgrade, the device will restart soon, please wait for the start, you can see the device display in the list if it has restarted successfully.
-
How to use smart search function
first of all, please enable the motion detection function. Then follow the procedure below:
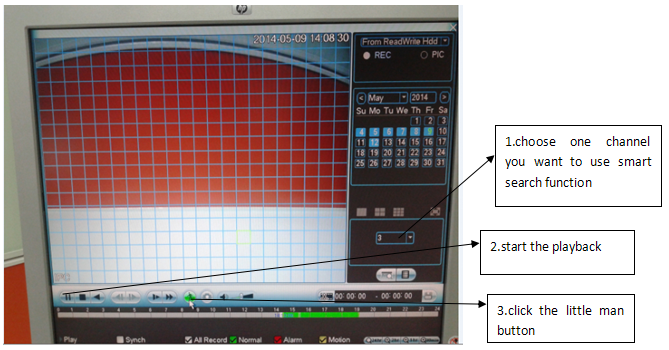
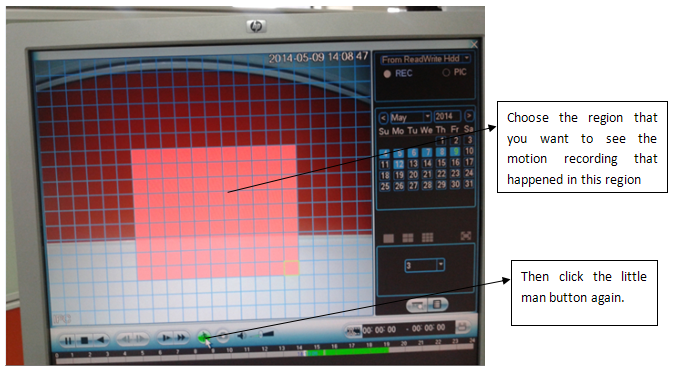
After you have done all these three steps, then you will see the image with grid, then choose the region you want to see the motion recording that happened in this region.
-
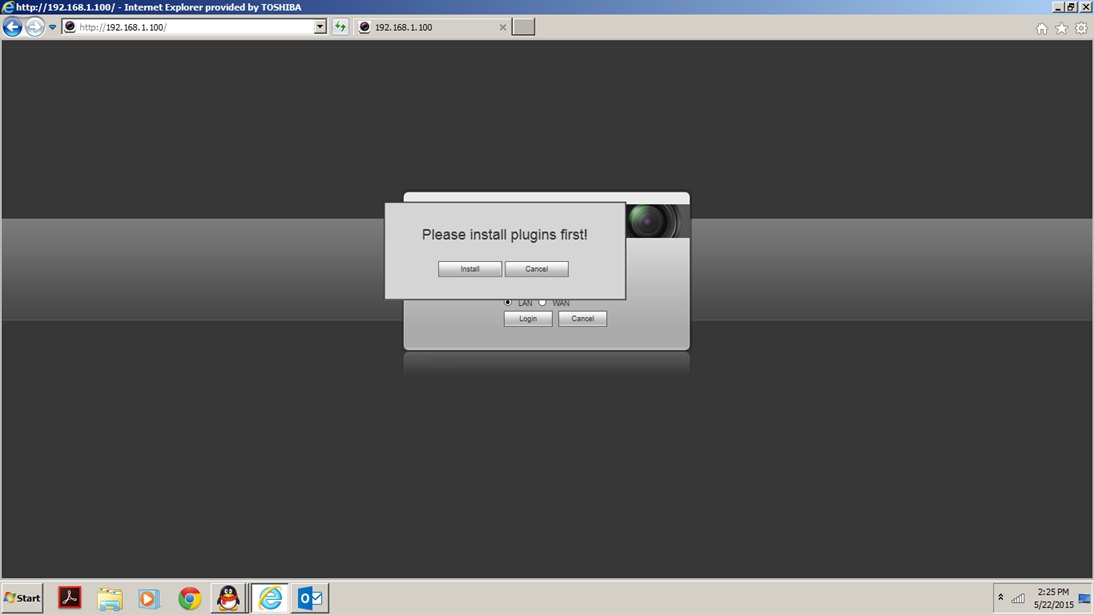
IE access tips to get into camera NVR DVR software IE 11
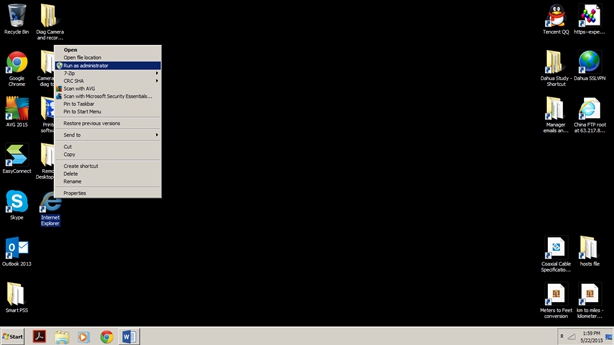
1.Run IE as administrator

2.Compatibility mode
3.Delete web plugin:
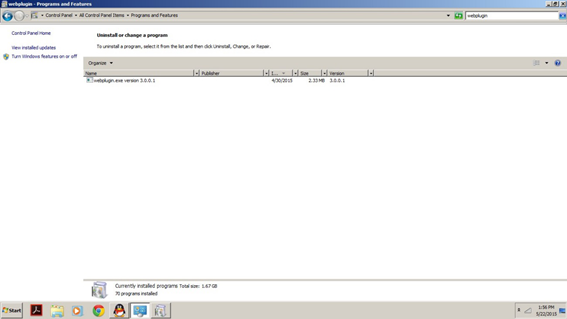
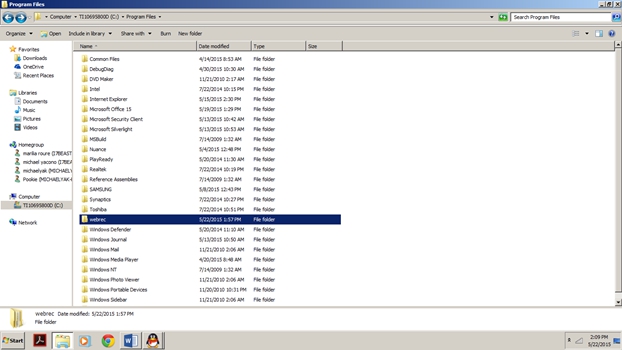
4.Go to the webrec folder:
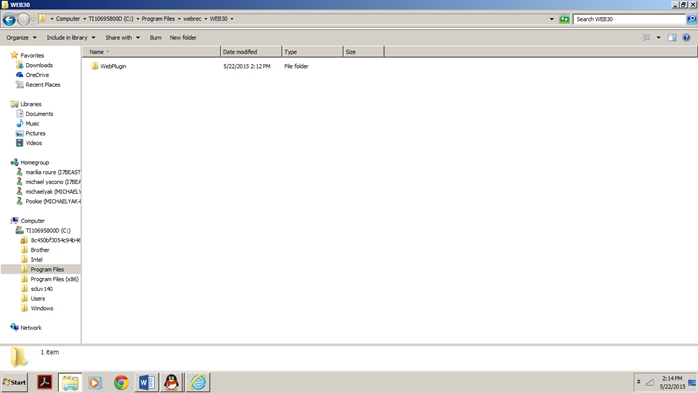
Go to the sub folder webplug in and delete the files.
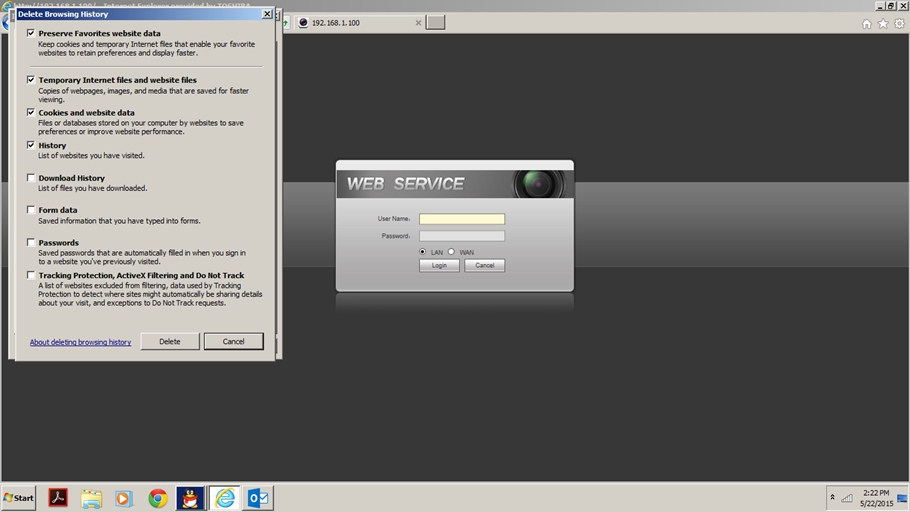
5.Delete browser cashe:
6.Restart your computer
7.Run IE as administrator
8.Go to back to IE and go to the ip address of your recorder. You will be prompted to reinstall the plugin files. Log in normally
-
Motion Notification
1.First thing do the port forwarding, Or DDNS, or PPPoE, just make the DVR online in the internet.
-
Quickddns
Use the domain name(whetherthe default or custom domain name) with the username blank.enable ddns(the box uper ddns type),click test button, it will tell you register successfully.This way you can use directly and the domain will expire in one year later.
Second way,you use the domain name but also fill the username in red circle(this username is the one you register in www.quickddns.com), once you do that, you enable the ddns,click the test button,after it show register successfully, this device you can find in your ddns account,so this way,the advantage is you can add different device to your own account and it is easy to manage the device.

-
Smart search
Does motion recording need to be enable for smart search to work?
No. there is no need to enable the motion record to make the smart search to work. They are two individual function.
If not can you verify, as you have mention to me whether this feature is enabled.
1. Make sure the IP camera enable the motion detect, if the motion detect enable, when the motion happan, you will see the motion icon in the live view(make sure
the motion detect area choose the whole screen)
2. go back to video playback interface
3.choose the channel which include the motion, double click switch to single channel model
4.click the smart search button, then choose the area(suggest the whole screen as the smart search area)
5.the smart search button from gray change to bright(selectable ),click the button
6.it will show the video with motion automatically
7.the screen show"Are you sure to exit smart search now?”,choose " Yes" to quit the smart search play back.
-
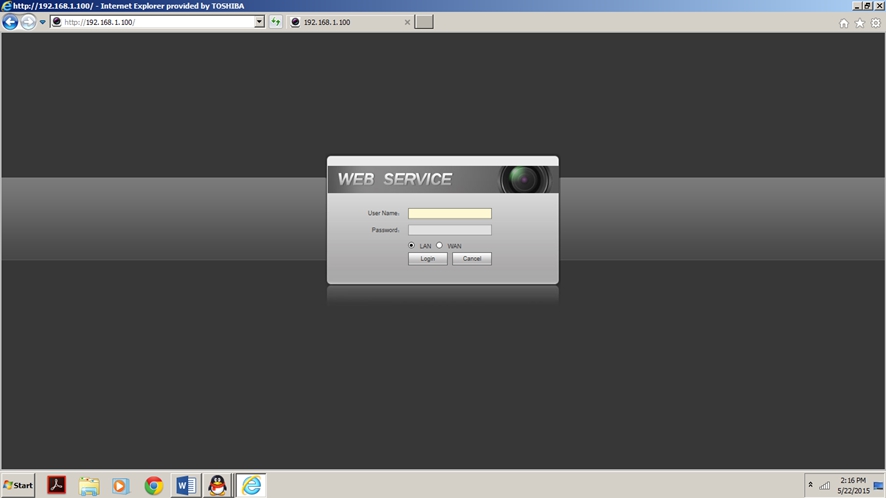
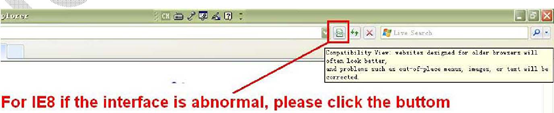
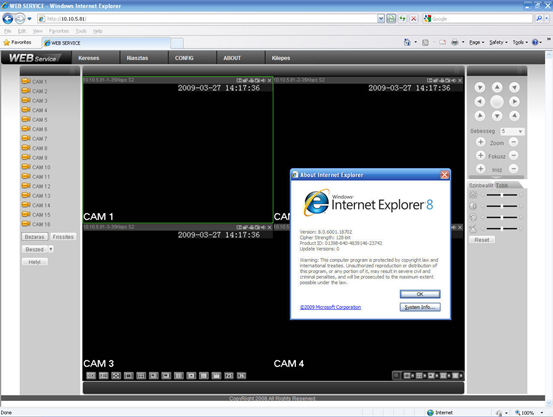
View DVR with IE8
1.General Description
This document is for how to view our DVR through web interface with IE8. When you meet problems with IE8, please refer to this manual.
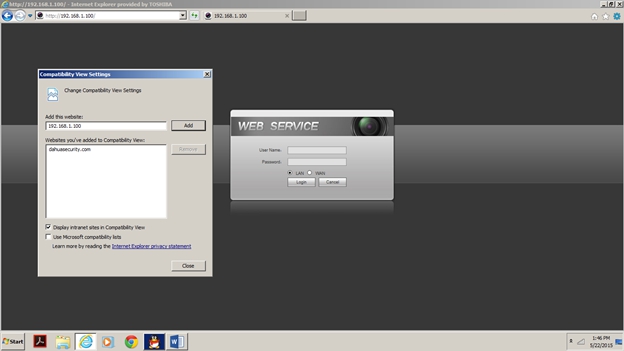
2.Run Web interface with IE8
For IE8,sometime it will not run with the right mode, there 2 ways to solve the problem
- Use the Compatibility View function of IE8
With this way, every time you open the IE interface, must click this button
- Add the certain IP address or website into Compatibility View Settings
A、 Choose Compatibility View Settings in Tool menu
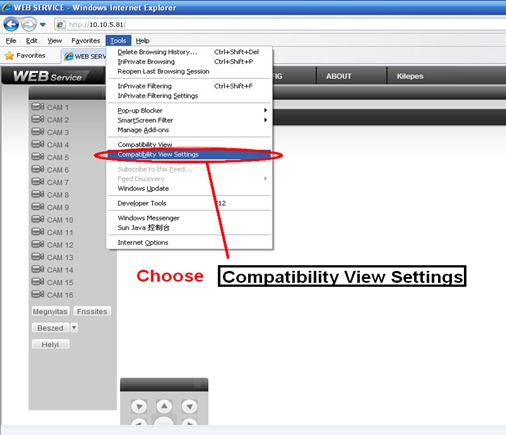
B、Add the IP or domain name of DVR (NVR,IP Camera) into Compatibility View Settings list
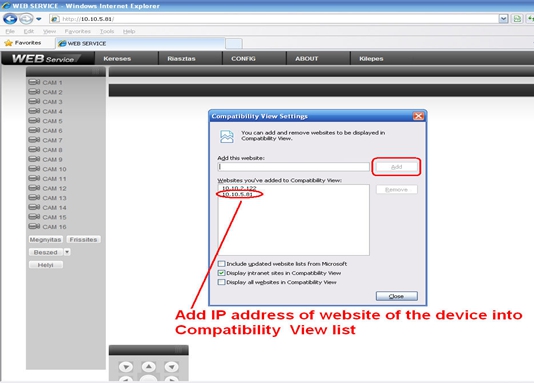
C、Now you can get the web interface with right mode
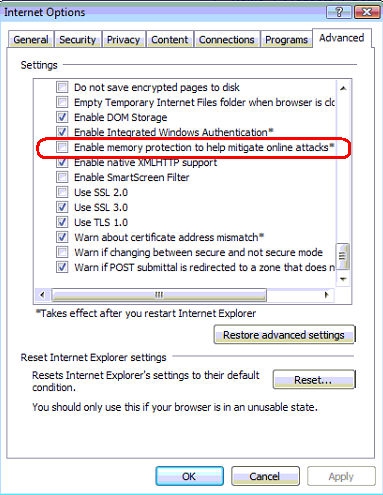
3. Download ActiveX with IE8
A、For some PC when update windows and install IE8, it will not install the ActiveX
B、Please disable Enable memory protection to help mitigate online attacks
4. Further Information
If you still have any problems about these functions, please contact with our engineer
-
Email snapshot
1.Please set up the snapshot mode for trigger.
Main menu---setup—camera—encode.
Mode: Trigger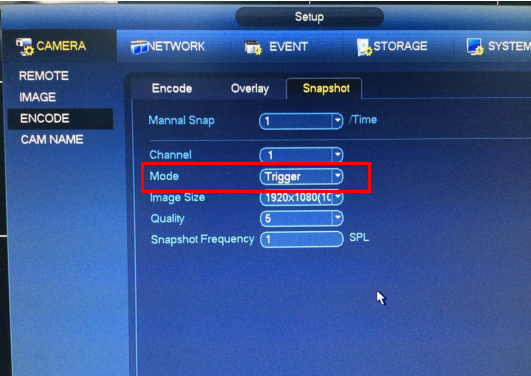
2.Setup the snapshot schedule. Main
menu---setup—storage---snapshot.
Please enable the alarm snapshot schedule.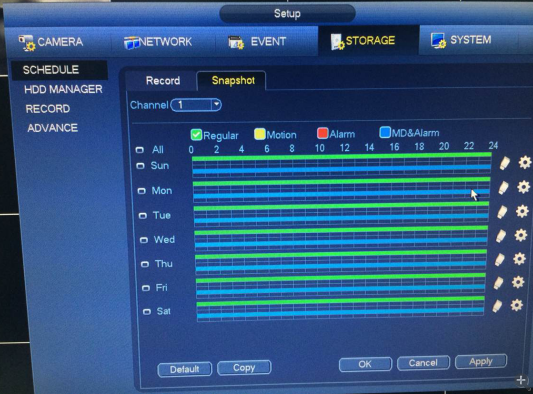
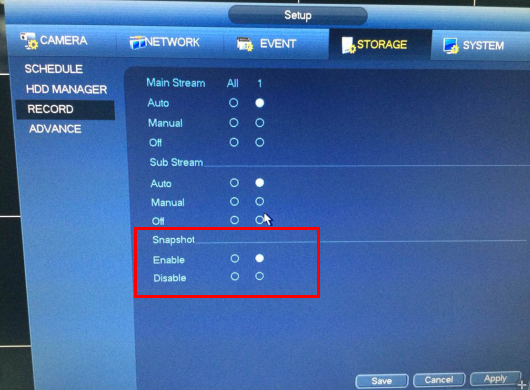
3.Enable the snapshot record
4.Set the alarm with snapshot. Main menu---setup---event.

5.Set the email function with attachment.
Main menu---setup---network---email.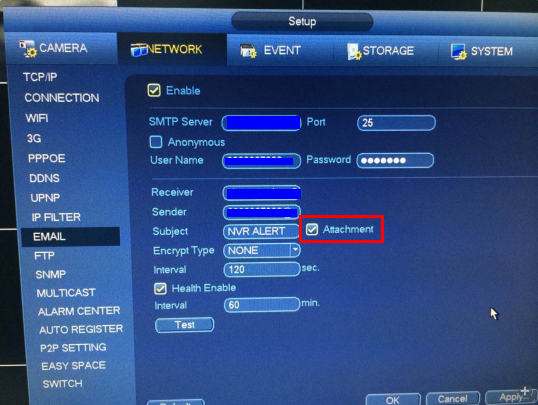
-
Email Setting
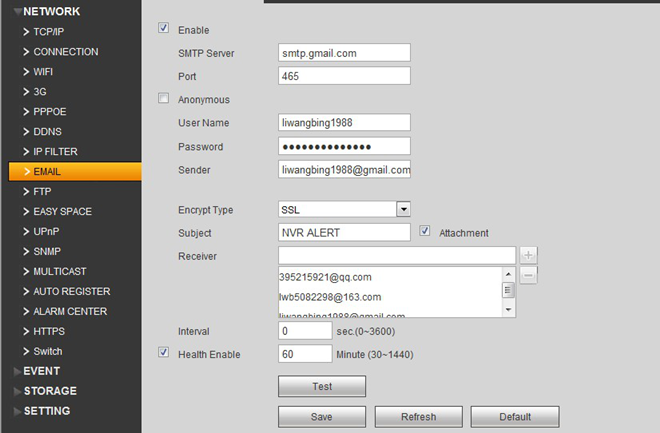
for
SMTP Port (TLS) 587
SMTP Port (SSL) 465 If Gmail normally 465.
SMTP Port (None) 25 you can set it by manually.
*make sure sent the motion detect,enable the function and send email
4. You will see the motion detect after you finish the setting
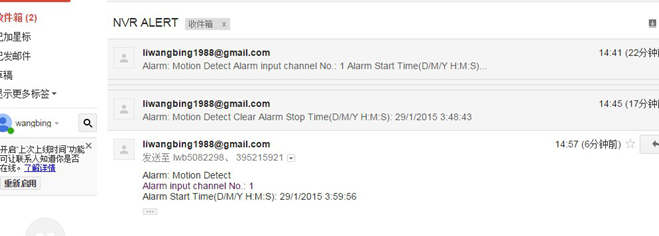
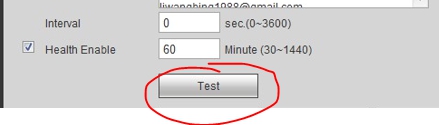
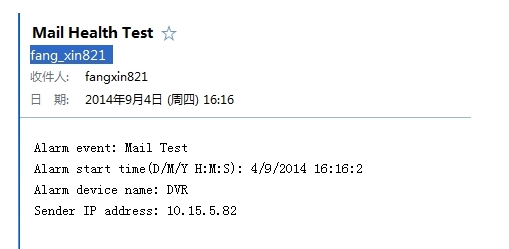
Health Check
If you enable the Health Enable bottom, and click the TEST button, the DVR will send you a email, just give you the TEXT information to tell you the email function is working ok.
-
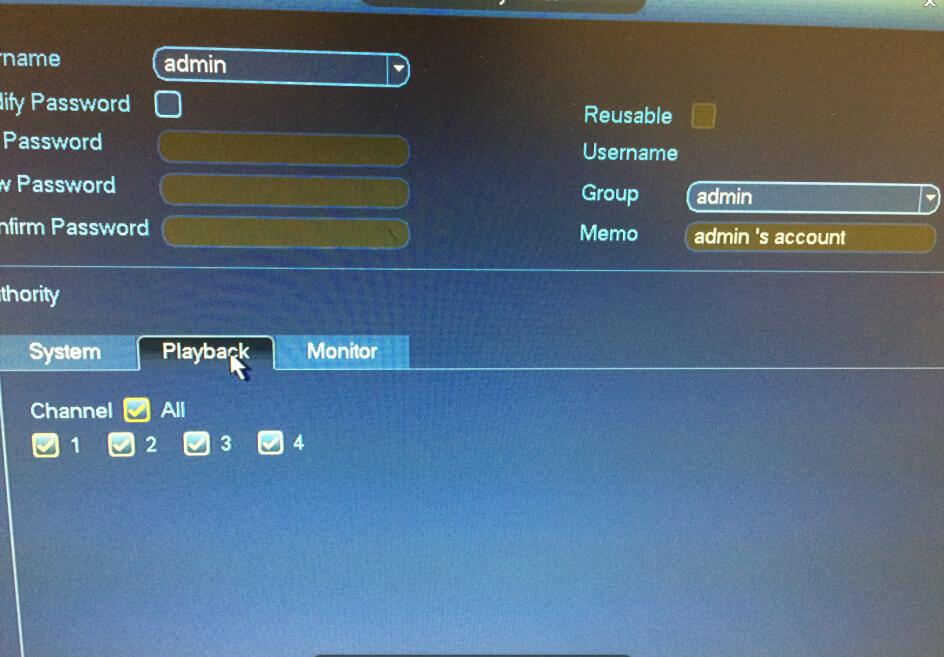
How to check the right of account
1.System->Account->Modify
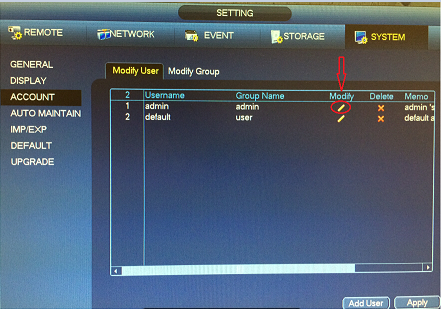
2.Check the account right

-
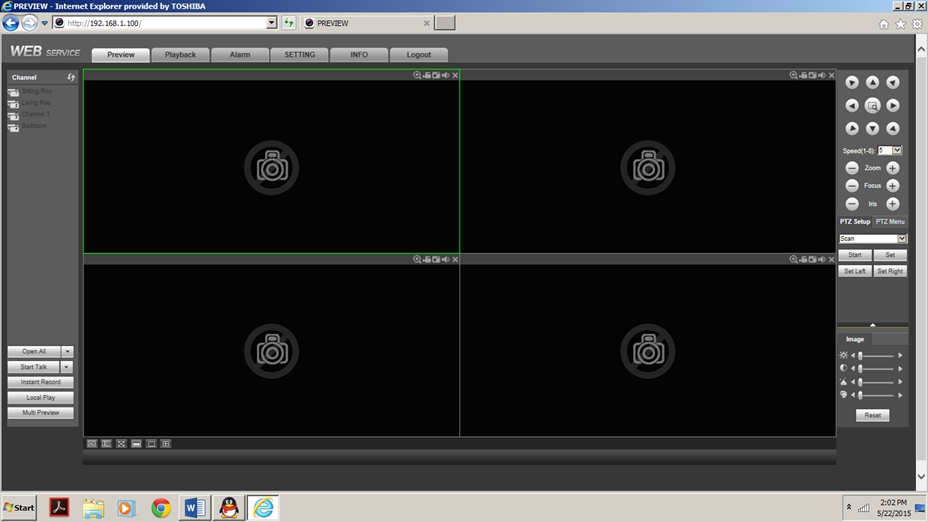
Real-time play operation instructor
Set up Real-time play server:
1.Login the system, and move the mouse to the top of any channels, no need click, it will show a toolbar as below:
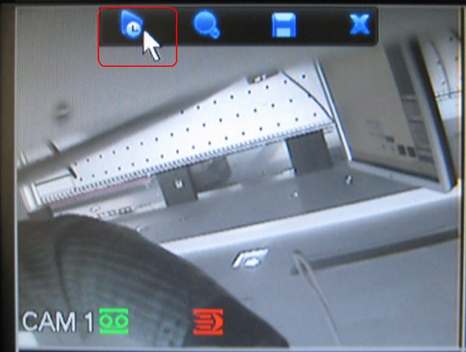
2.Left-click the red frame portion of the button(this button is real-time play button), you can see that the channel replay the video which is the choose channel.

3.Real-time play could set playback time at Real-time play option under the GENERAL directory. And the maximum value is 60 min. You can see the red frame portion of the below two pictures.
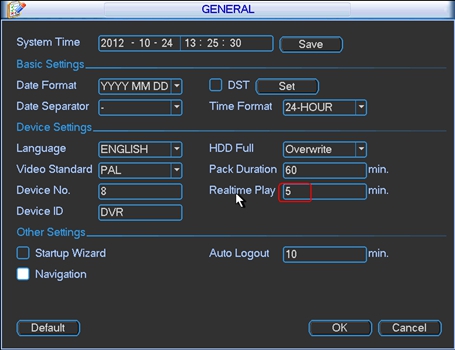
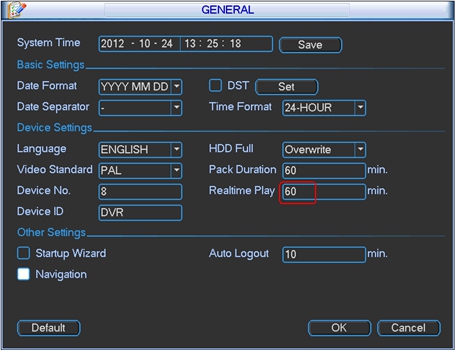
4.Right-click at any channels if you want to stop playback video. But when you replay the video dose not any other operation.
-
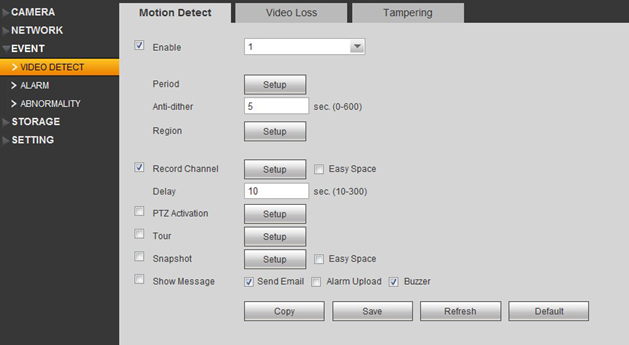
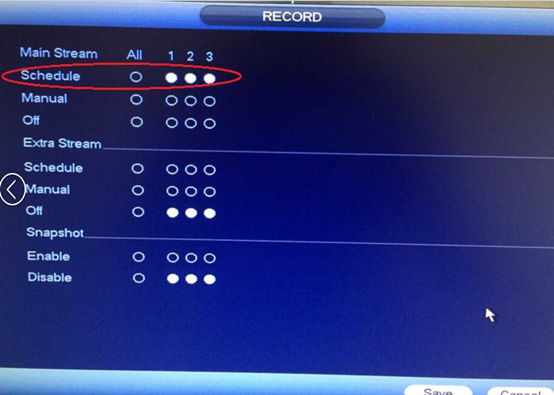
How to set the motion recording
1. Enable the mothin detect,make sure every channel enable and through the dropdown list in the red circle to check whether we already finish enable,also you can check the motion detect region to see whether it satisfy your requirement.
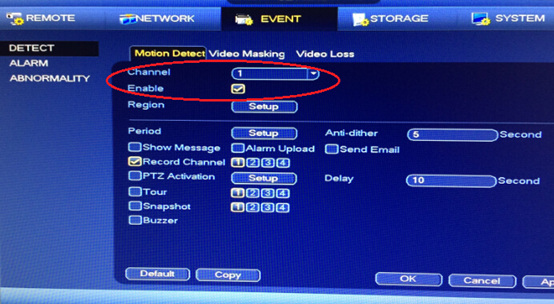
2. Set the Record Type,make sure set to Schedule. and then Go to schedule,set all channel Motion Detect Recording, and click Apply then click OK
3. Go back to the main menu to test whether we set motion detect successfully

4. Go to search interface to check whether we have the motion detect record
-
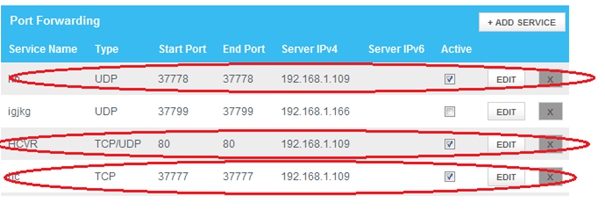
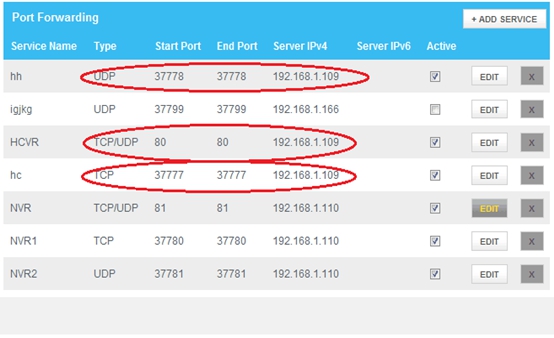
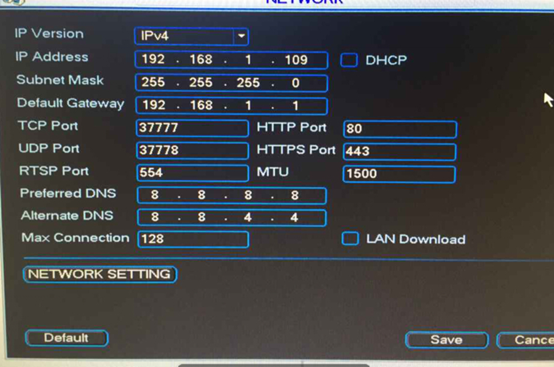
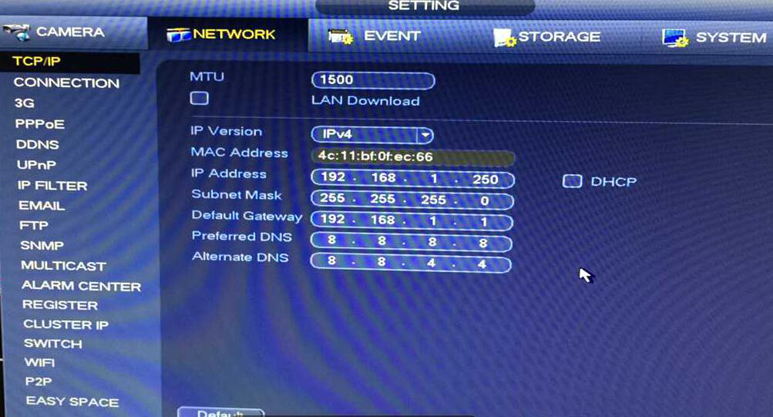
How to set the DDNS
1. first go to the router ,enter the Port Forwarding,set the Type and Port,it should be correspond
with you DVR setting(For example just like below 192.168.1.109 is Device IP,router external IP is 76.109.110.113).
2. Enter the DDNS setting,choose the Custom Domain Name,you can use the special name,then pls click the"Test"button,then it will show successfully registered.
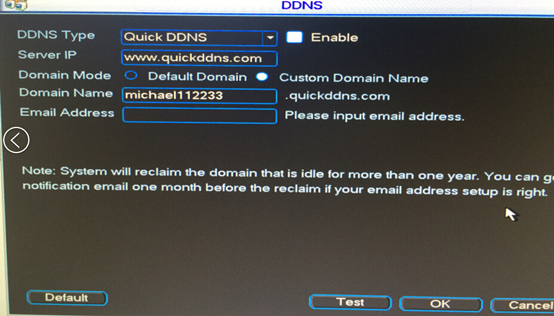
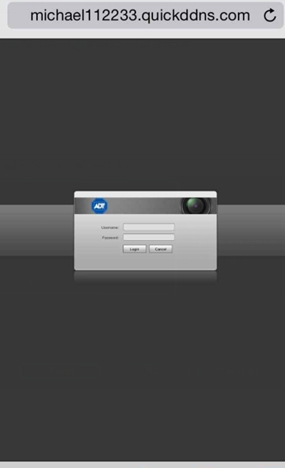
3. Then enter the Domain Name we set just now:"michael112233.quickddns.com". it can work properly
-
How to connect the IPC through PoE switch
The Final Topology of the Network

Notice: For you first time use the device, please follow the step below, don’t connect all the device in one time,please refer to the step below
The NVR factory default IP is 192.168.1.108 and the camera facory default IP is also 192.168.1.108. The NVR will provide the IP addresses automatically for the IP cams that are directly connected to the NVR via the built in PoE switch,no additonal configuraion. However, for the IP cameras that are connected to the external PoE switch, the camera IP addresses will need to be added manually. Please ensure that the manually added IP addresses have the same segments (192.168.1.***) in the example below) as the NVR .So below Step by Step Connection Instructions is for through the external PoE switch to connect the IP cams.
Step 1: Right click the mouse, choose the Main Menu-> Setting-> Network
Step 2: Modify the IP of the NVR, change to 192.168.1.***, when you finish, click save (The reason of modification the IP is to avoid the IP conflict with the IP camera)
Step 3: Go back to Main Menu,choose the Setting->Camera.

Step 4: This step is very important. First of all, please connect the PoE switch to NVR’s LAN port, then please try to connect the first IP Cam to the PoE switch,then after the first one is all settle down, then try to connect the next one. It means in this step we will connect the IP Cams one by one. The reason is to avoid the IP conflict. Now please connect the first Cams to PoE switch,wait for few seconds, click the IP Search, you will see the cams on the top part. Then click the pencil to edit the cams. Also the reason is to avoid the IP conflict. After modify the IP, click the OK to save the new IP, it will show Modify IP Successuful.
Step 5: After you finish configuration of the first IP cam you can then connect the second one and then the third until all the cams connect to the switch.
Step6: Add the device in the list to the NVR, you have two ways to add the device. First: Choose the device in the upper column list,then double click to add the device,the cams will show in bottom column and the status will from red to green. (green means add successfully)
Second: Manual add,you can use the manual add button,enter the IP address of the cams and the Usename and password,click ok to add the cams
-
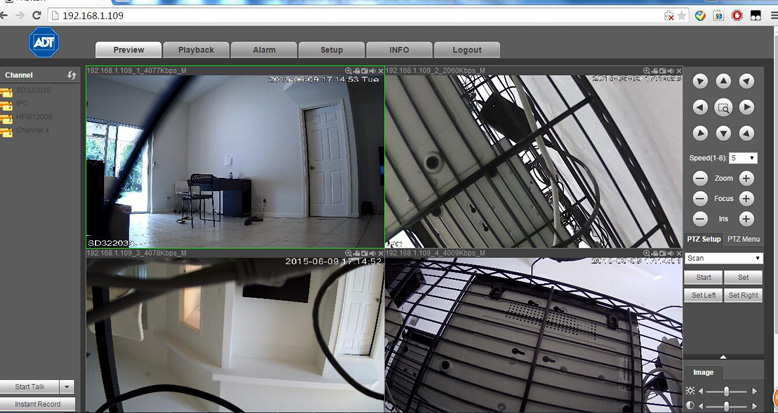
ADT-How to get around plug in browser issue for Chrome only
Open Chrome and go to the web page listed below.
Chrome://flags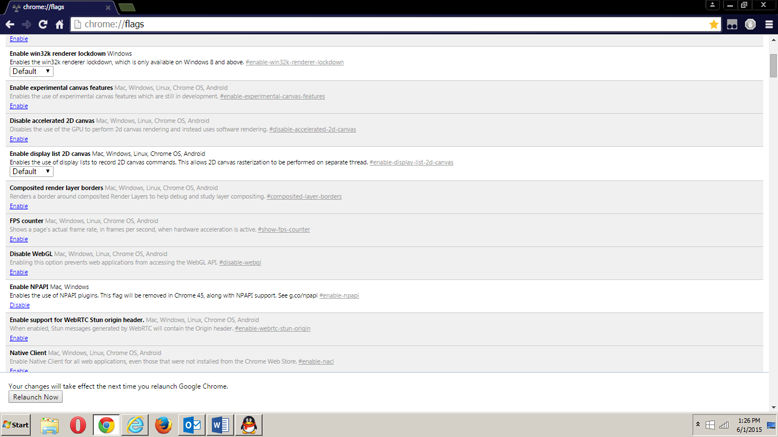
Look for the NPAPI option and make sure it is enabled.
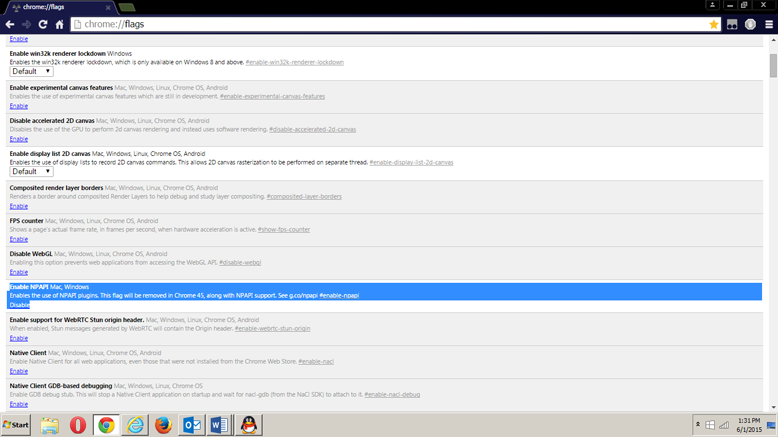
Close the browser and open a new one. Go to the ip address of your recorder. Ignore the error messages and enter your user name and password.
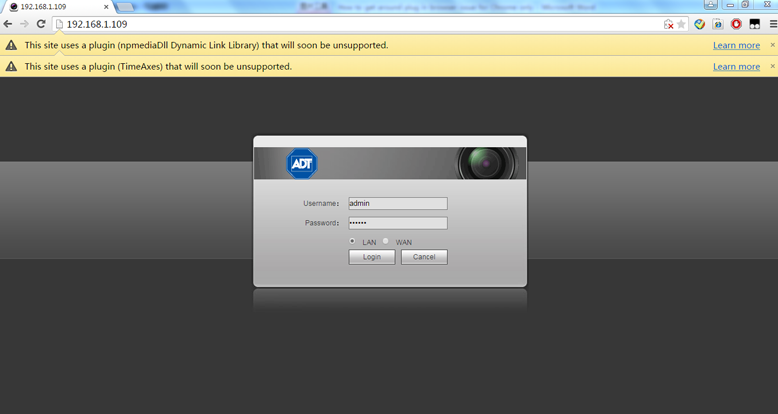
You should now have access to the preview page. You can click x on the yellow borders to remove the Chrome error messages.
-
How to enable IPC's Motion Detect
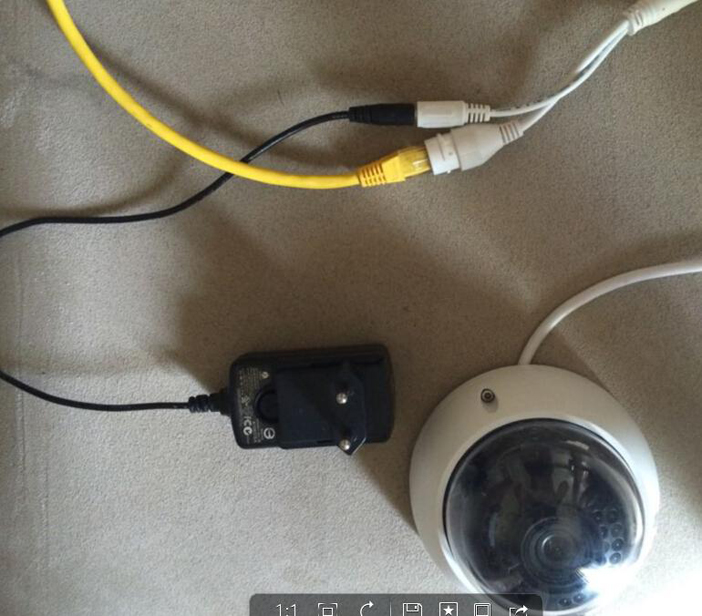
1.Connect the IPC use external power(12V 1A) or if you have PoE switch,you can use the PoE switch as the power.
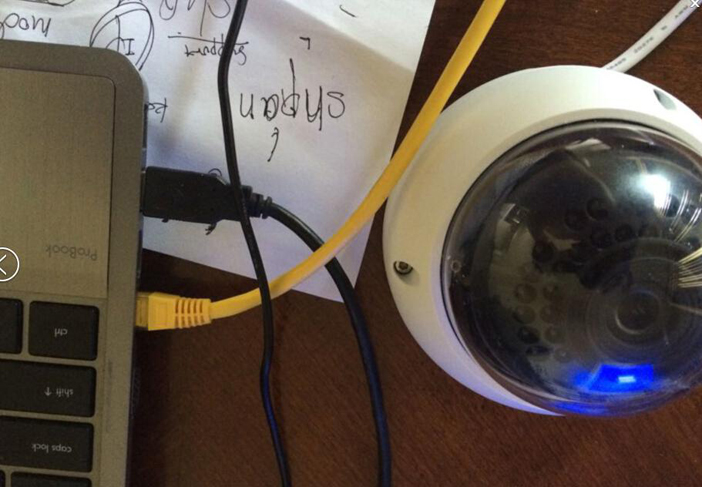
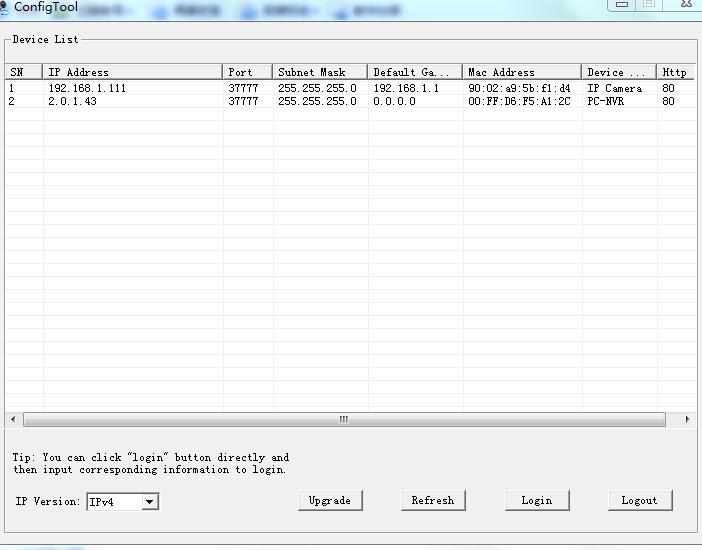
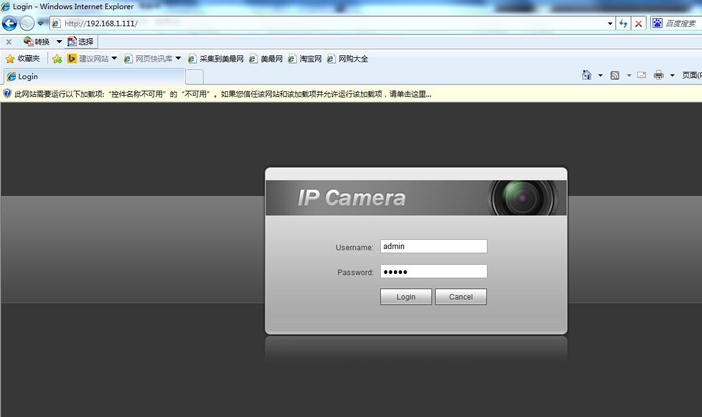
2.Use the Configtool to search the IP address.Here is example: IPC's IP address 192.168.1.111
3.login the IPC,make sure your computer is in the same segment of IPC,my computer's IP is 192.168.1.108.usually username is admin and password is admin
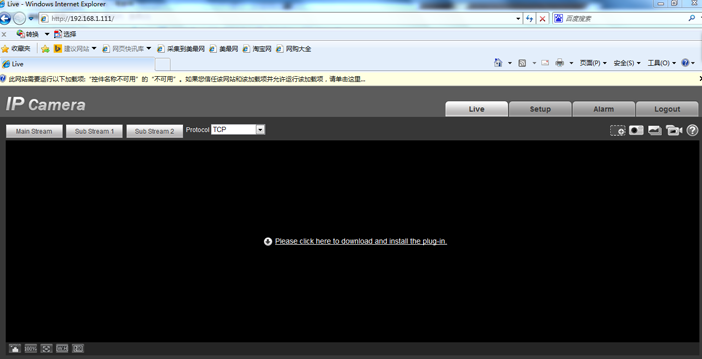
4.click to download and install plug-in
5.enabe the motion detect

6.go back to connect the IPC to NVR to try.Trigger the motion to see whether it has red icon on the preview screen.If it will show. it means that the motion detect set successful